
Best Boondi Laddu | Perfect Boondi Laddu Recipe | Indian Sweet
Introduction
Boondi Laddu is a beloved Indian sweet made with tiny deep-fried gram flour balls soaked in sugar syrup and shaped into round laddus. A must-have for festivals like Diwali, Ganesh Chaturthi, weddings, and auspicious occasions. Making them at home is simple with the right method and ingredients, yielding soft, melt-in-mouth laddus.
Cooking Time
- Prep Time: 10 minutes
- Cook Time: 5 minutes
- Total Time: 15 minutes
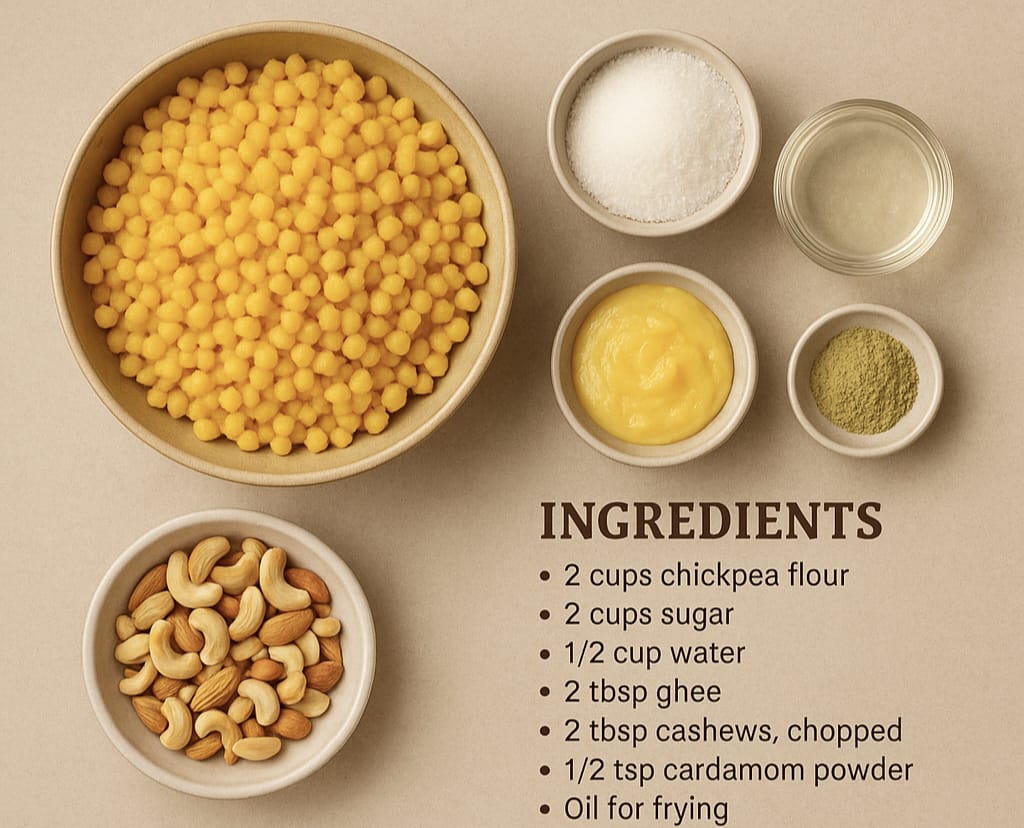
Ingredients
For the Boondi:
- 1 cup besan (gram flour)
- 2–3 tbsp water (adjust as needed)
- A pinch of baking soda (optional)
- Oil or ghee for deep frying
For Sugar Syrup:
- 1 cup sugar
- ½ cup water
- 4–5 crushed cardamom pods
- A few strands of saffron (optional)
- 1 tsp lemon juice
Optional Add-ins:
- 1 tbsp ghee-roasted cashews
- 1 tbsp raisins
- 1 tbsp melon seeds
Step-by-Step Instructions
Step 1: Prepare the Batter
- Sift besan into a bowl.
- Add water gradually to form a smooth, flowing batter.
- Add baking soda if using and mix well.
Step 2: Make Boondi
- Heat oil/ghee in a deep frying pan.
- Hold a perforated ladle over the oil and pour batter to make small drops.
- Fry until cooked but soft. Drain on paper towels.
Step 3: Prepare Sugar Syrup
- Combine sugar and water, boil until one-string consistency.
- Add cardamom, saffron, and lemon juice, mix well.
Step 4: Mix Boondi & Syrup
- Add boondi into hot syrup, mix gently, rest for 10 minutes.
Step 5: Shape Laddus
- Grease palms with ghee and shape into laddus while warm.
- Let them cool and set.
Tips & Variations
- Use correct batter consistency to get round boondi.
- Do not over-fry; boondi should remain soft.
- Add rose water or saffron for aroma.
- Mix roasted nuts or melon seeds for texture.
- If mixture cools, warm slightly before shaping.
Serving Suggestions
Serve at room temperature. Ideal for Diwali, weddings, or any celebration. Pairs well with tea or after meals.
Health Benefits
Moderate consumption provides energy, protein, and essential minerals from gram flour and nuts. Helps in digestion and provides quick energy during festivals.
Frequently Asked Questions (FAQs)
Q1. Why are my boondis flat?
A1. Batter may be too thin. Adjust to flowing consistency.
Q2. How long can I store boondi laddus?
A2. Store in an airtight container for up to 7 days.
Q3. Can I make boondi without a jhara?
A3. Yes, but shape may vary; a skimmer works too.
Conclusion
Boondi Laddu is a timeless Indian sweet full of tradition. Making it at home brings festive joy with authentic taste and texture.
సులభమైన బూండీ లడ్డూ రిసిపీ | పండుగల భారతీయ మిఠాయి
పరిచయం:
బూండీ లడ్డూ, బూండీ లడ్డు లేదా బూండీ లడ్డూ అని కూడా పిలుస్తారు, చిన్న మినపప్పు బౌళ్ళను లోతుగా వేయించి, చక్కెర రసాయనంలో ముంచి, గోళాకార లడ్డూలుగా తయారు చేసే భారతీయ ప్రసిద్ధ మిఠాయి. దీన్ని దీపావళి, గణేశ్ చతుర్థి, పెళ్లిళ్లు, మరియు ఇతర శుభ అవకాసాలలో తయారు చేస్తారు.
ఇది కేవలం మిఠాయి కాదు, ఇది సంప్రదాయానికి సంబంధించిన ఒక భావోద్వేగం. సరైన పద్ధతి మరియు పదార్థాలతో ఇంట్లో తయారు చేయడం సులభం, ఫలితంగా మృదువుగా, గోళాకారంగా, చక్కెర రసంలో కడిగి తిన్నప్పుడు కూర్మంగా కరిగిపోతుంది.
తయారీ సమయం:
- తయారీ సమయం: 10 నిమిషాలు
- వేపక సమయం: 5 నిమిషాలు
- మొత్తం సమయం: 15 నిమిషాలు
పదార్థాలు:
బూండీ కోసం:
- 1 కప్పు బేసన్
- 2–3 టేబుల్ స్పూన్లు నీరు (తగినంత)
- ఐచ్చికంగా బేకింగ్ సోడా ఒక చిటికెడు
- లోతుగా వేయడానికి నూనె లేదా నెయ్యి
చెక్కెర రసాయనం కోసం:
- 1 కప్పు చక్కెర
- ½ కప్పు నీరు
- 4–5 ఏలకుల గుళికలు
- ఐచ్చికంగా కుంకుమ రేశాలు
- 1 టీస్పూన్ నిమ్మరసం
ఐచ్చిక పదార్థాలు:
- 1 టేబుల్ స్పూన్ నెయ్యి వేయించిన కాజూ
- 1 టేబుల్ స్పూన్ ద్రాక్షకాయలు
- 1 టేబుల్ స్పూన్ తుమ్మరికాయలు
తయారీ విధానం:
దశ 1: మిశ్రమం తయారు చేయండి
- బేసన్ ను ఒక గిన్నెలో వ sieve ద్వారా తక్కువ దండు చేసుకోండి.
- నీరు కలపండి, మృదువైన పిండిపచ్చి consistency రావాలి.
- ఐచ్చికంగా బేకింగ్ సోడా కలపండి.
దశ 2: బూండీ వేయడం
- లోతుగా వేయడానికి నూనె/నెయ్యి వేడి చేయండి.
- చిద్రము ఉన్న స్పూన్ ద్వారా పిండిని పోసి చిన్న బూండీలు తయారు చేయండి.
- మృదువుగా వేపి, పేపర్ టవల్ పై Drain చేయండి.
దశ 3: చక్కెర రసాయనం తయారు చేయండి
- చెక్కెర మరియు నీటిని మిక్స్ చేసి ఉడికించండి (one-string consistency)
- ఏలకులు, కుంకుమ, నిమ్మరసం కలపండి.
దశ 4: బూండీని రసాయనంలో కలపండి
- బూండీని వేడి చక్కెర రసాయనంలో కలిపి 10 నిమిషాలు ఉంచండి.
దశ 5: లడ్డూలుగా మడకలు
- తక్కువ వేడి ఉన్నప్పుడు చేతులలో నెయ్యి వేయి, లడ్డూలుగా మడకలు.
- చల్లారనివ్వండి, సర్దుబాటు చేసుకోండి.
సలహాలు & వేరియేషన్లు:
- సరైన consistency లో Batter తయారు చేయండి.
- బూండీని ఎక్కువ వేపక వద్ద వేపవద్దు, మృదువుగా ఉండాలి.
- సువాసన కోసం రోజ్ వాటర్ లేదా కుంకుమ వాడవచ్చు.
- కాజూ లేదా తుమ్మరికాయలు కలపండి.
- మిశ్రమం చల్లారితే, తక్కువ వేడిగా మళ్లీ వేయండి.
సేవింగ్ సూచనలు:
రూమ్ టెంపరేచర్ లో సర్వ్ చేయండి. దీపావళి, పెళ్లి, లేదా ఏదైనా వేడుకలకు సరైనది. టీతో లేదా భోజనం తర్వాత తినడానికి బాగుంది.
మితంగా తింటే బూండీ లడ్డూ శక్తి, ప్రోటీన్, మినరల్స్ ఇస్తుంది. మినపప్పు మరియు కాజూలు వల్ల జీర్ణానికి మద్దతు, శక్తి పెరుగుతుంది.
అన్ని ప్రశ్నలు (FAQs)
ప్ర: నా బూండీలు సన్నగా, చపలుగా ఎందుకు వుంటాయి?
సమ: బట్టర్ చాలా దున్నగా ఉండవచ్చు. మృదువైన consistency లో మార్చండి.
ప్ర: బూండీ లడ్డూలను ఎంత కాలం నిల్వ చేయవచ్చు?
సమ: గ్యాస్-టైట్ కంటైనర్ లో 7 రోజులు వరకు నిల్వ.
ప్ర: జార లేకుండా బూండీ చేయవచ్చా?
సమ: అవును, కానీ ఆకారం మారవచ్చు. స్పూన్ లేదా స్కిమ్మర్ ఉపయోగించవచ్చు.
ముగింపు:
బూండీ లడ్డూ ఒక శాశ్వత భారతీయ మిఠాయి, ఇంట్లో తయారు చేయడం సులభం. దీని రుచి, సువాసన, మరియు సంప్రదాయ గుణాలు వేడుకల్లో ఆనందాన్ని ఇస్తాయి.
Leave a Comment